Deal with a Duplicated Expense Item
Create/Update a Recurring Expense
Delete or Stop a Recurring Expense
View the PDF version of an Invoice
Create/Update a Recurring Invoice
Delete or Stop a Recurring Invoice
Create/Update Transaction Details
EZBooks is an easy-to-use, online bookkeeping software designed for small businesses to manage their finances and stay on top of their cash flows.
This user guide is designed to explain how to use EZBooks.
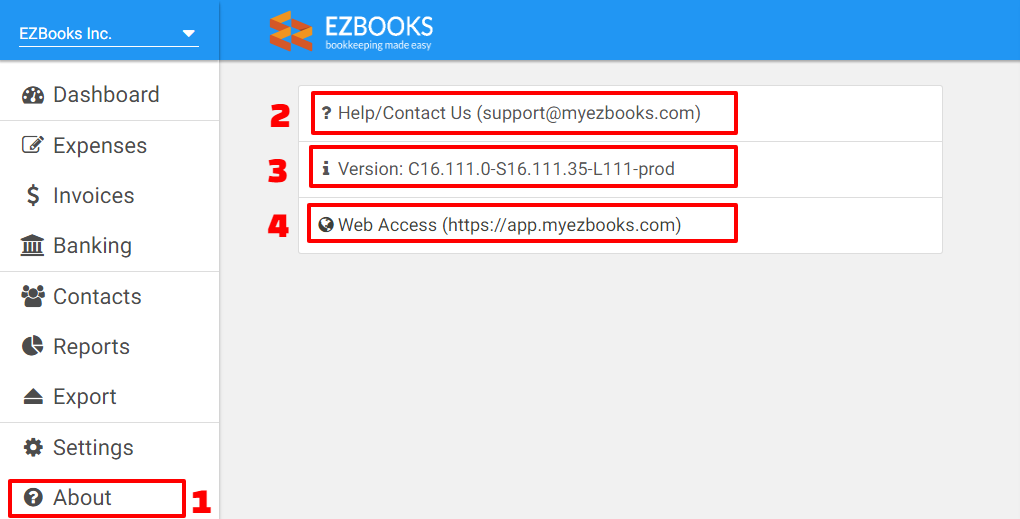
EZBooks can also be accessed in the following web browsers from your desktop. The web access provides an easy-to-use user interface similar to that in the iOS and Android app.
EZBooks Web Access URL: https://app.myezbooks.com
Web browsers that are compatible with EZBooks:
Navigation
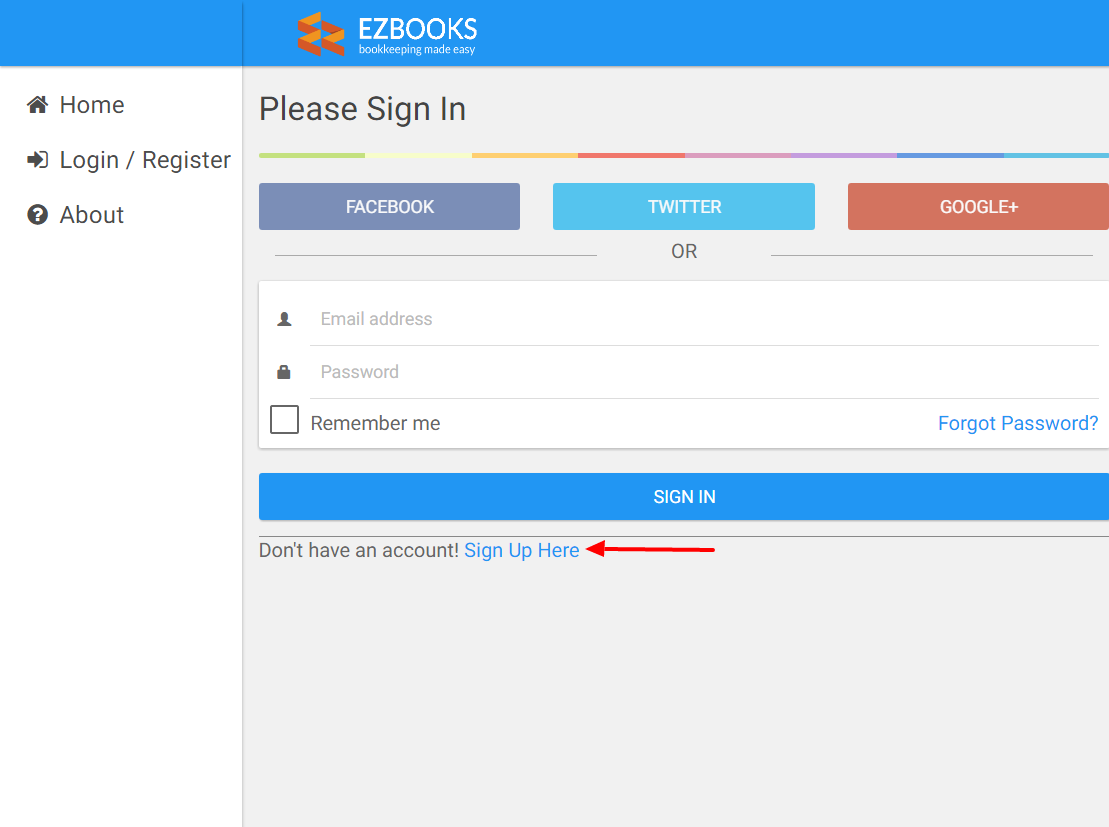
Left Menu → Login / Register
1. If you are a new user, please sign up from the 'Login / Register' page.
Click on 'Sign Up Here'.
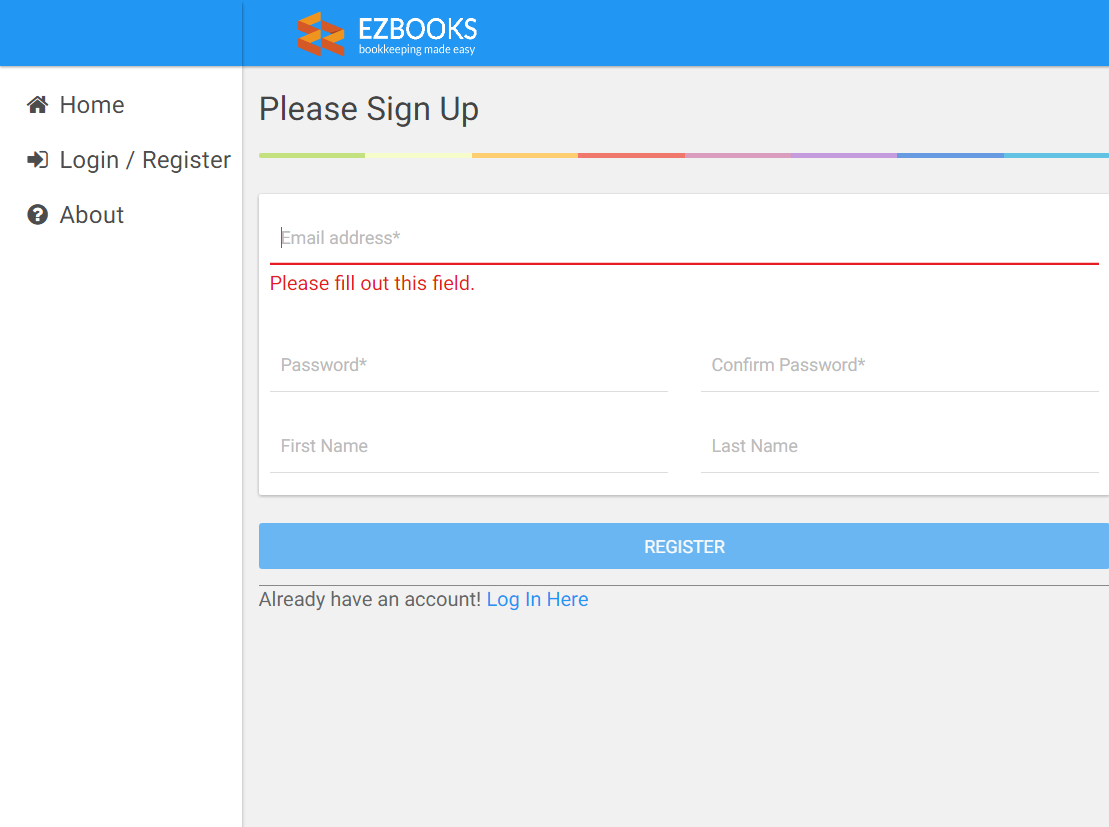
2. ‘Sign up’ page
Navigation
Left Menu → Login / Register → Sign Up Here
Fill in the sign up form
Click on the 'REGISTER' button
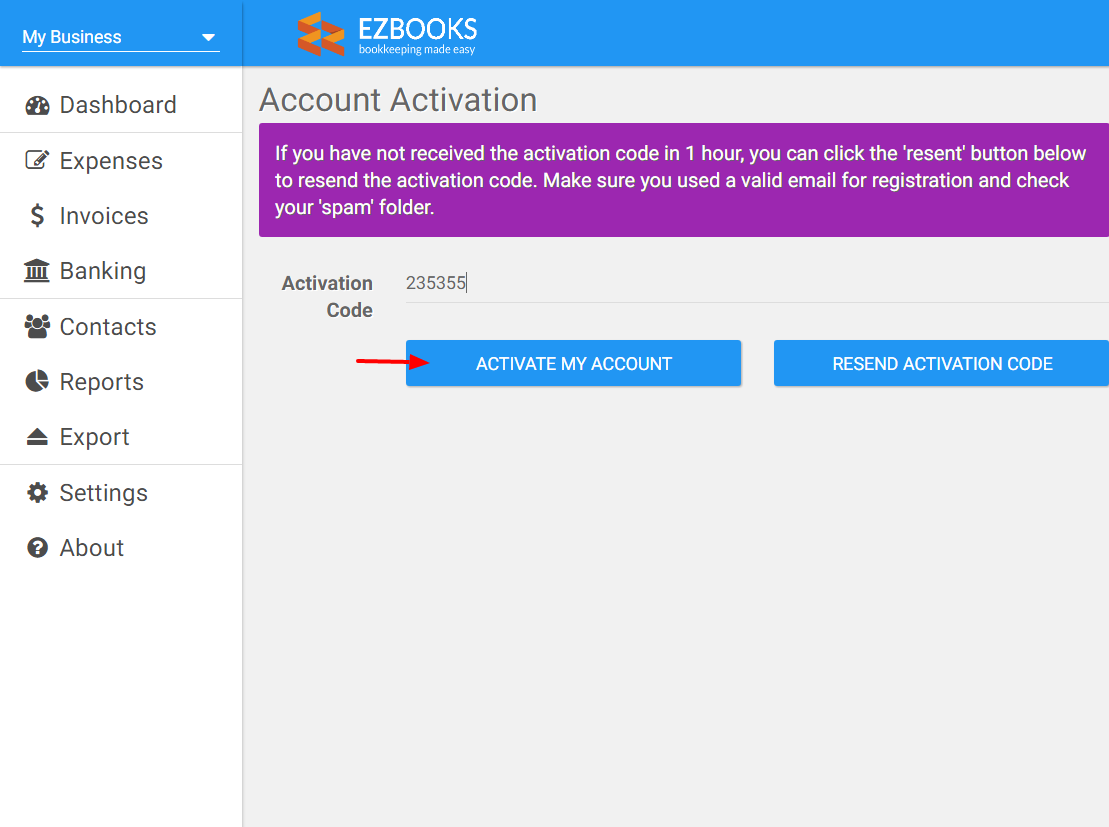
3. Verification
Once you register your email, an account activation email will be sent to you with an activation code. Please enter the code in the 'Account Activation' page below and click on the 'ACTIVATE MY ACCOUNT' button.
If you did not receive your activation code after 1 hour, you can ask the system to resend it by clicking on the 'RESEND ACTIVATION CODE' button. Please check your email's spam folder, in case your email provider puts the activation email in it.
Once you receive and enter the activation code, click on the 'ACTIVATE MY ACCOUNT' button and your account is now active.
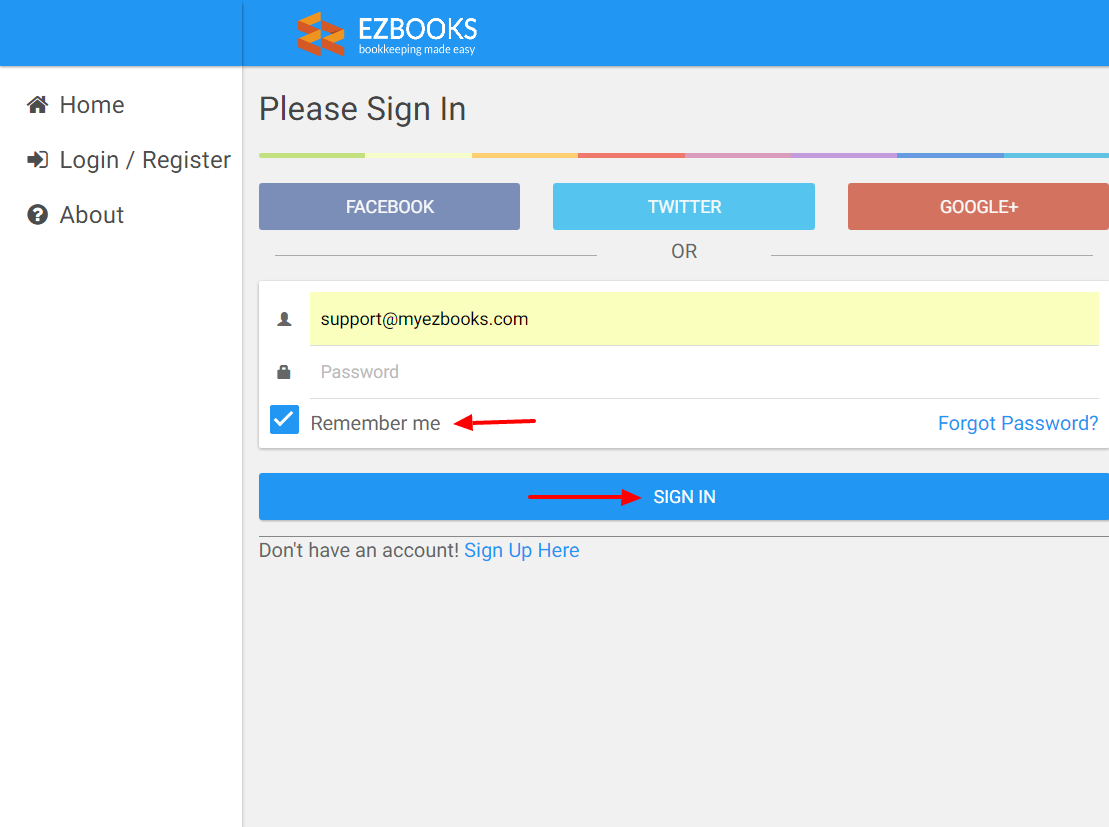
Navigation
Left Menu → Login / Register
From left menu, click on 'Login / Register'
Fill in the sign in form
Click on the 'SIGN IN' button
Navigation
Left Menu → Login / Register → Forgot Password
If you forgot your password, click on the ‘Forgot Password?’ link on the sign in form to have your password reset.
If you are already logged in, you will need to logout from the app first to access the 'Sign in' page. Refer to the Logout section.
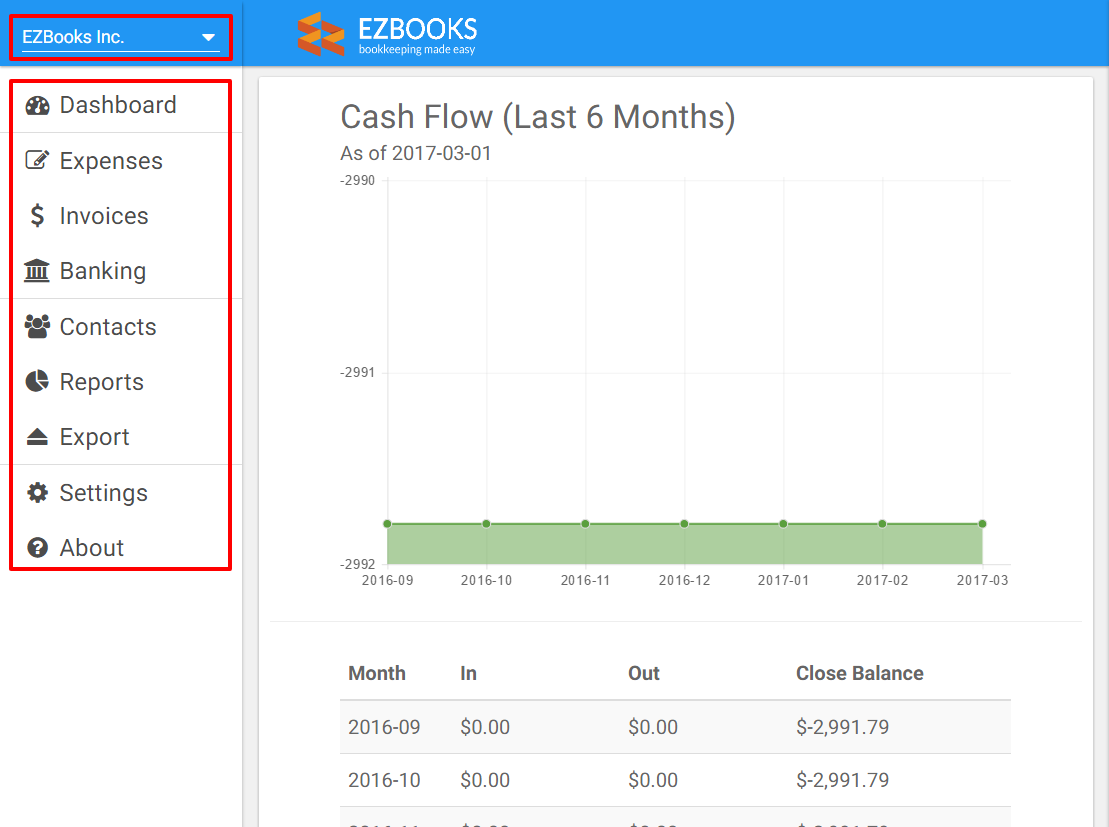
● After logging to the app, select the business you want to work on from the drop-down list on the top left corner.
● You will see the list of expenses, invoices, banking transactions, reports, and etc. for that business.
● Click on one of them and you will see the entries you had entered previously. By default you will see the content of ‘Dashboard’.
● If you have more than one business in the app that you want to work on, go back to the drop-down list to select from there.
Navigation
Left Menu → Dashboard
After logging into EZBooks, the default page shown is the 'Dashboard'. The dashboard gives you a clear picture of your company’s finances. 2 charts are displayed:
An expense is incurred when money goes out of your business. Whether it's a product you buy to run your business, or food that you eat while on business trips, it’s important to track the money you spend.
Navigation
Left Menu → Expenses
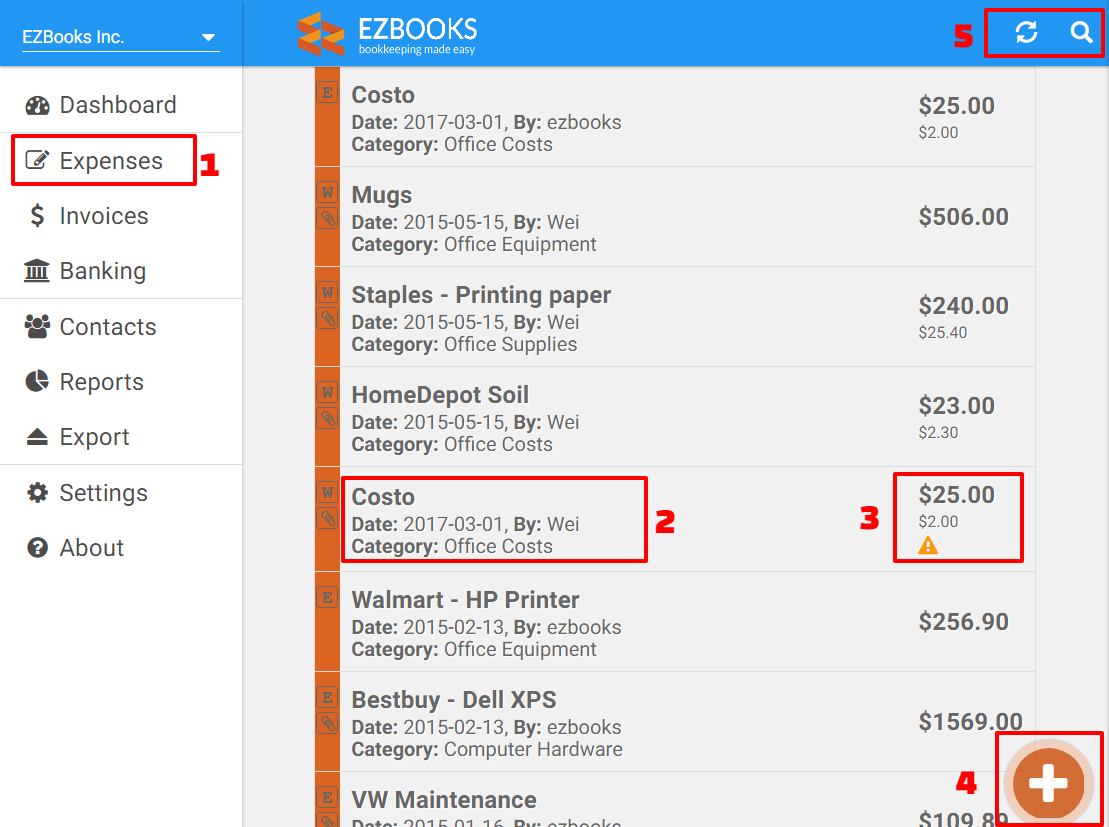
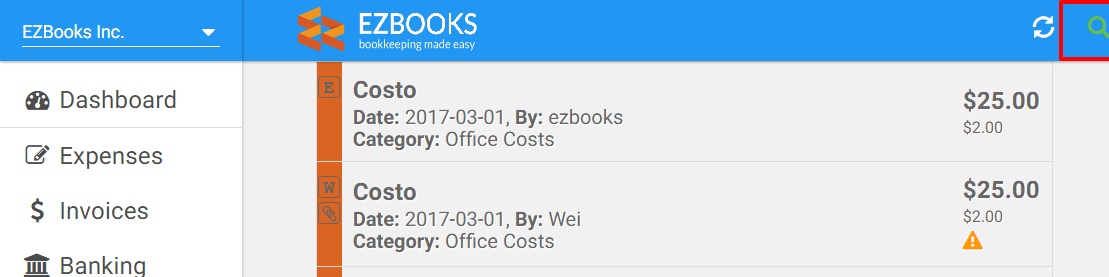
To look at your existing expenses, click on 'Expenses' from the left menu. You will see a list of expenses for the selected business.
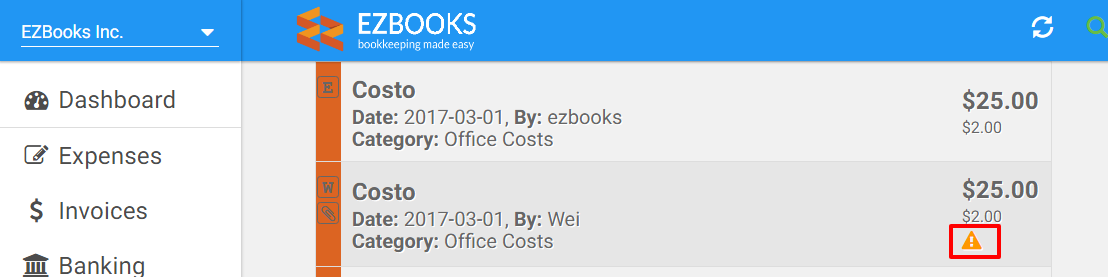
The orange triangle warning icon indicates that this expense item might have been entered more than once - described in the 'Deal with an Duplicated Expense Item' section.
Navigation
Left Menu → Expenses → Add Button
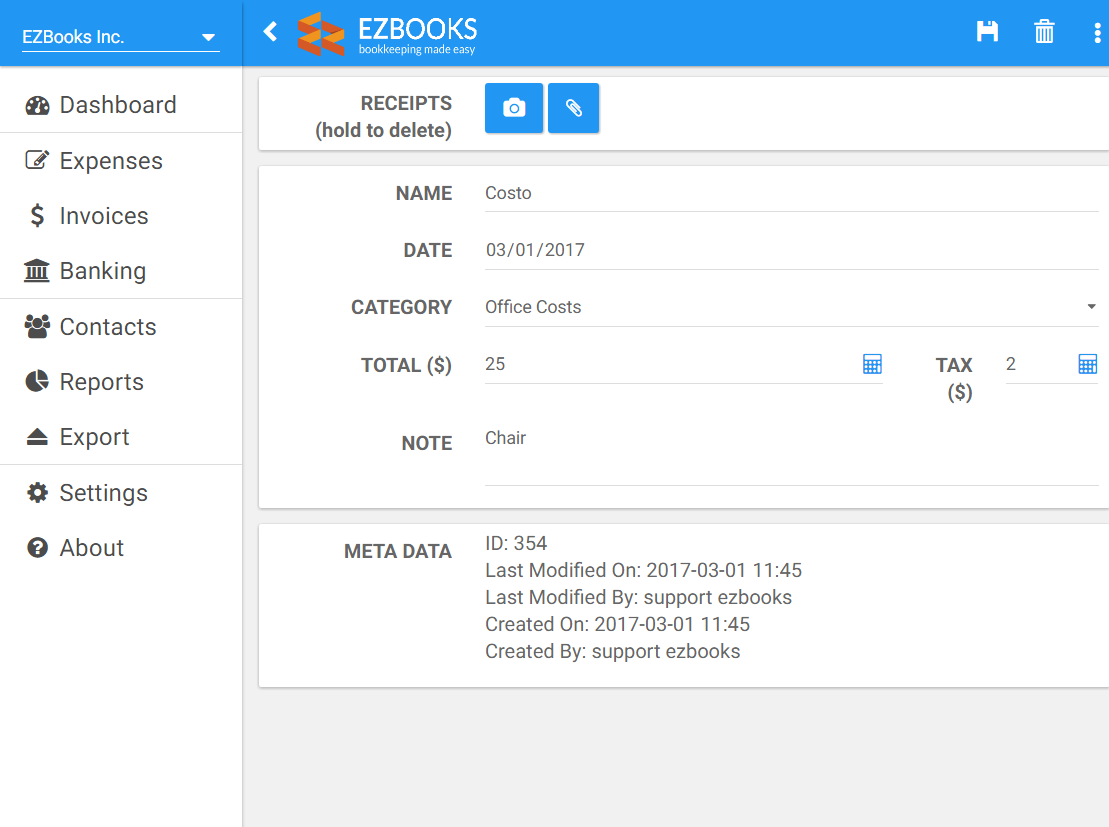
To create a new expense, click on the add button which will bring you to the expense entry page.
Navigation
Left Menu → Expenses → Select Existing Item → Menu Icon → Duplicate
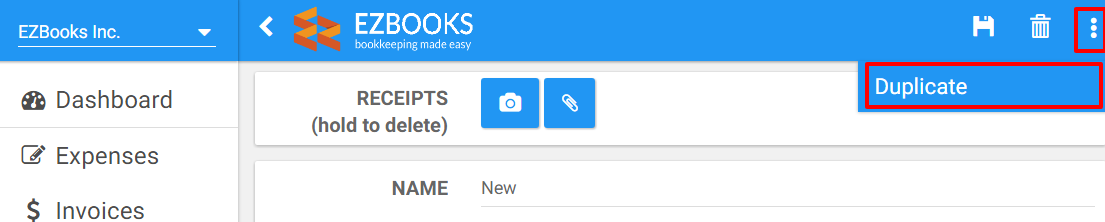
In many cases, there are similar or recurring expenses. EZBooks does not support recurring expenses currently, but provides an easy way to duplicate an existing expense.
Click on the menu icon on the top right corner, and then click on 'Duplicate'.
Navigation
Left Menu → Expenses → Search Button
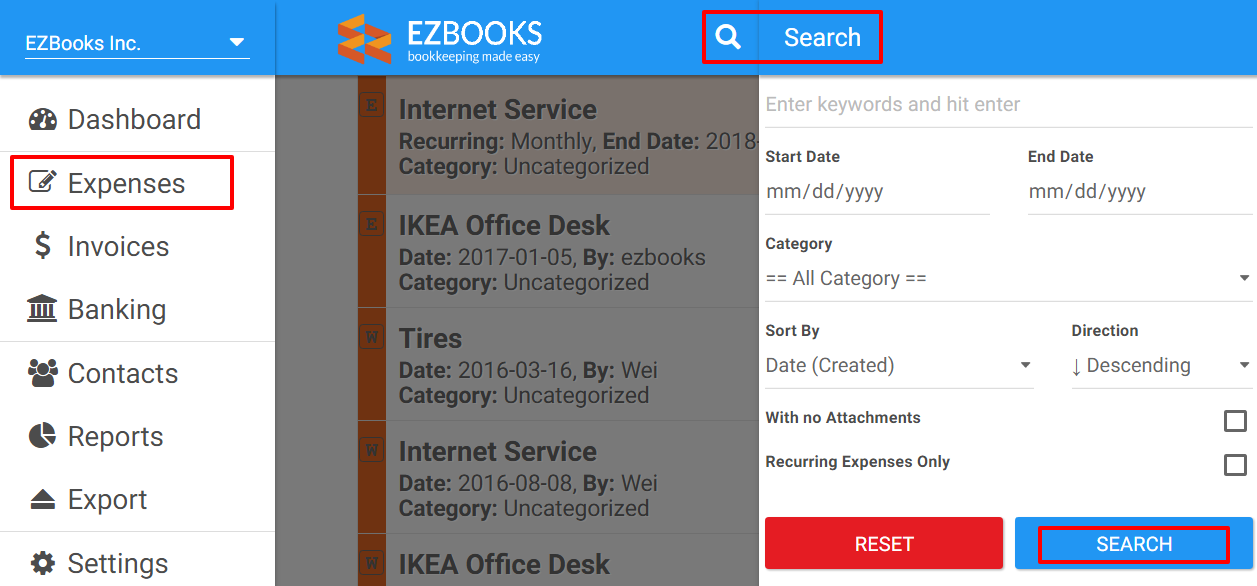
You may need to filter the list of expenses by name, date, category, etc. to find the expenses. From the expense listing page, click on the 'magnify glass' icon on the top right corner which will bring you to the right searching panel.
When a search/filter is active, the 'magnify glass' icon turns to green, indicating an active filter is in place. In this case, a keyword 'costco' is entered, so only expenses from Costco are shown in the list.
Navigation
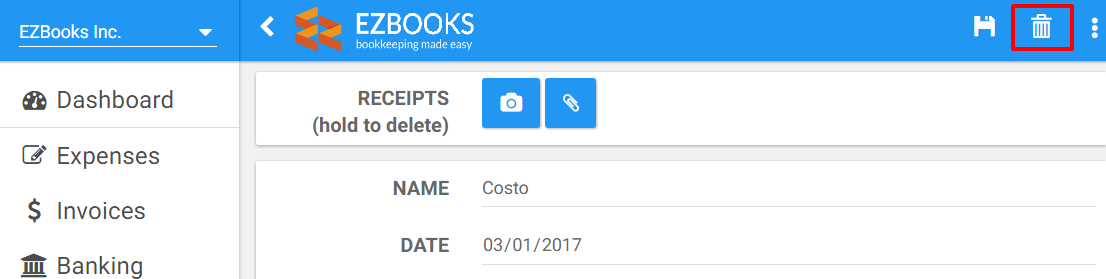
Left Menu → Expenses → Select Existing Item → Delete Button
To delete an expense, click on the 'trash bin' icon on the top right corner. Deleting an expense will also delete the associated bank transaction.
Sometimes an expense could be entered into EZBooks more than once by mistake. When EZBooks detects an expense item having the same date and amount to an existing one, it will warn you on both of the expense listing and editing pages.
On the expense listing page there is an orange triangle warning icon for the duplicated expense item. Once you click on it you will see more details for this warning.
You can verify the corresponding duplicated expense item by clicking on the underlined ‘duplicated expense item’, or dismiss the warning message by clicking on the underlined ‘dismiss this warning’.
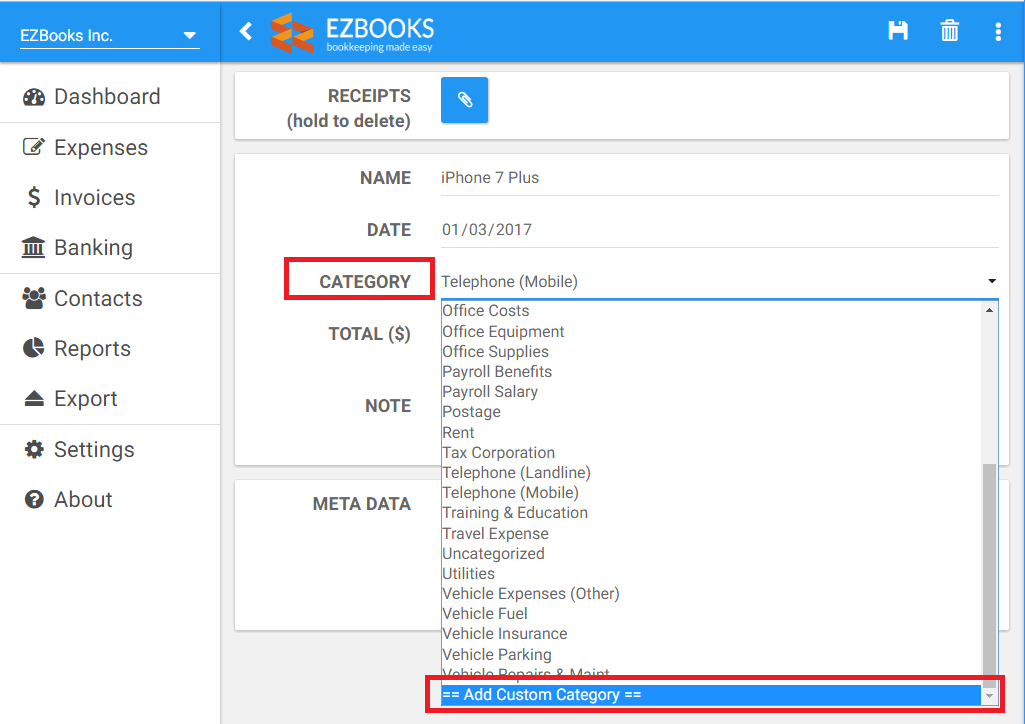
When entering an expense item, you may want to create your own category for the expense. To do so, you can select ‘Add Custom Category’ from the category list when creating the expense.
Note, custom expense category is covered in the ‘Expense Category’ of the 'Settings' section.
A recurring expense is one that incurs on a periodic basis, and recording it can be automated in EZBooks. Examples of such an expense would be your monthly phone bill or rent.
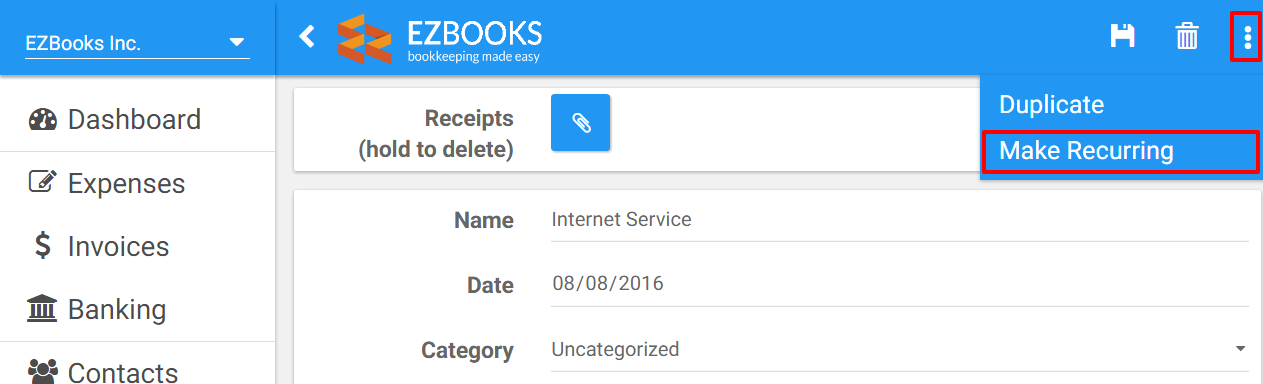
Navigation
Left Menu → Expenses → Select Existing Item → Menu Icon → Make Recurring
To create a recurring expense, you first create a regular expense(Create/Update an Expense) or choose an existing expense as a template, then you can make a recurring expense from this template.
Open the regular expense that you'd like to use as template, from the top menu bar, click on 'Make Recurring'
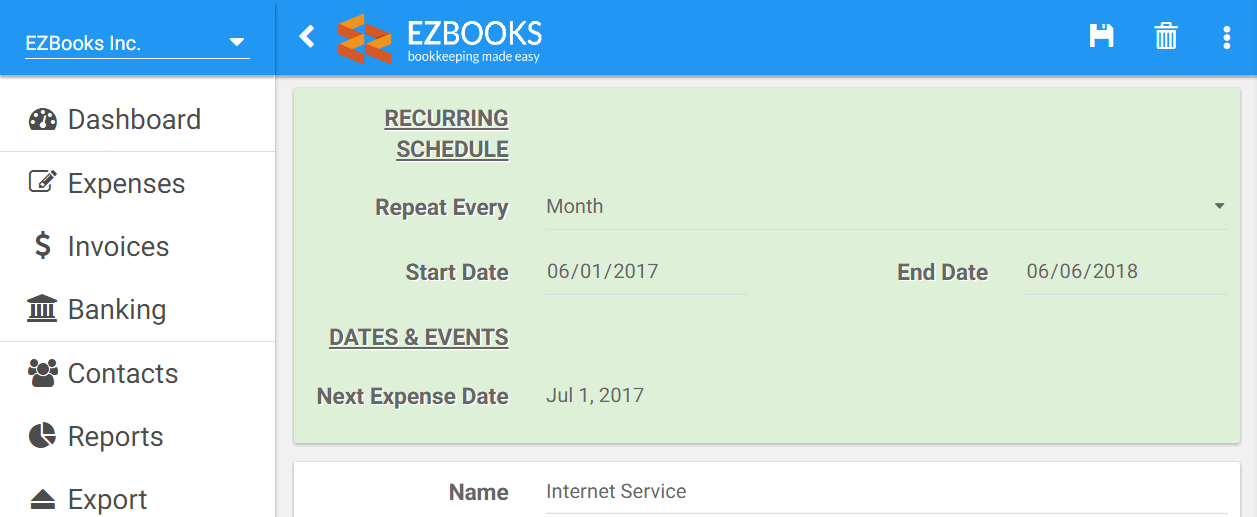
Once the recurring expense is created from the selected template, you can fill the details of the recurring schedule:
Navigation
Left Menu → Expenses → Search Button
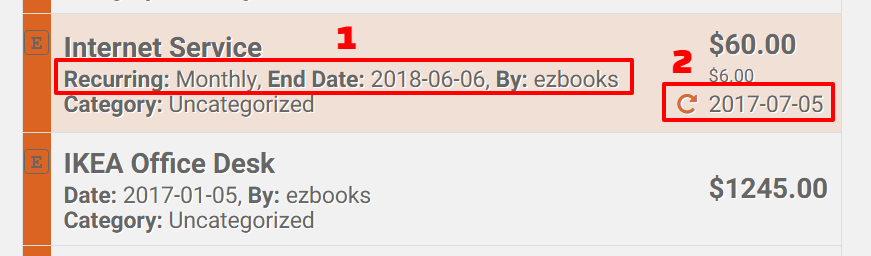
The recurring expenses are list on the same 'List Expenses' page. The recurring expenses have additional information shown on the listing:
By default, recurring expenses and regular (non-recurring) expenses are both shown on the listing page, while the recurring expenses are shown with a different background color and additional information about the recurring schedule. If you'd like to list the recurring expense only, you can do that using the 'Filter/Search Expenses' functionality.
A recurring expense can be deleted the same way as a regular expense. Refer to 'Delete an Expense' for details.
There are no transactions associated a recurring expense, so deleting a recurring expense will not change any payments or transactions.
To stop a recurring expense without deleting it, just change the 'End Date' of the recurring expense from the 'Create/Update a Recurring Expense' page.
An invoice is a document containing goods sent or services provided, with the payment information that the client has to make.
Invoices in EZBooks are sent to your clients in a PDF document through emails.
Navigation
Left Menu → Invoices
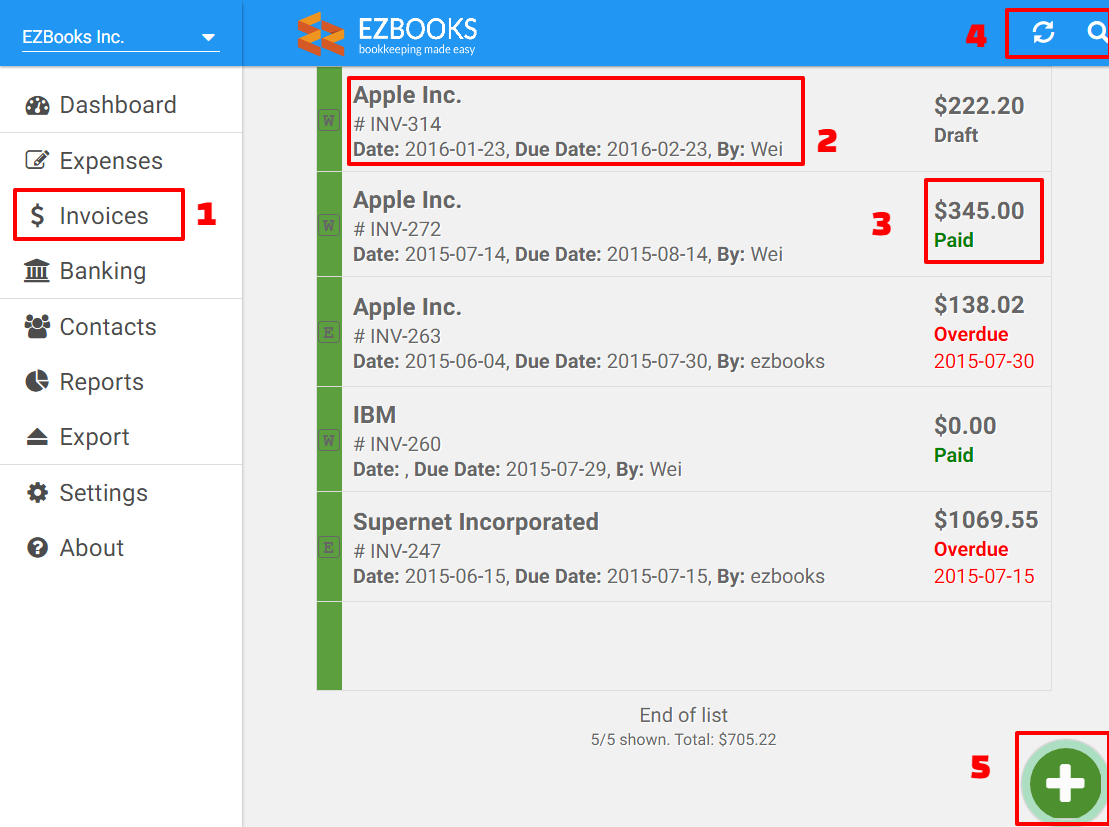
To look at your existing invoices, click on 'Invoices' from the left menu. You will see a list of invoices for the selected business.
Navigation
Left Menu → Invoices → Add Button
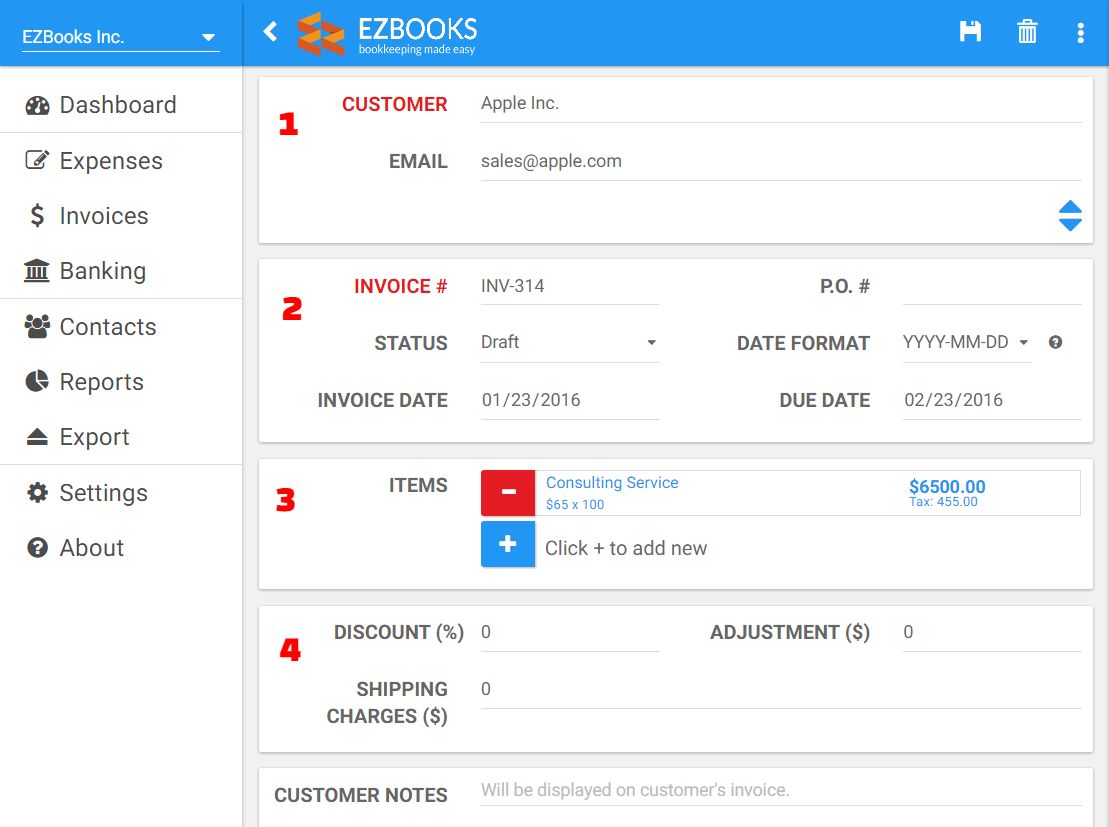
To create a new invoice, navigate to the List Invoices page and click on the ‘+’, which will bring you to the invoice entry page below:
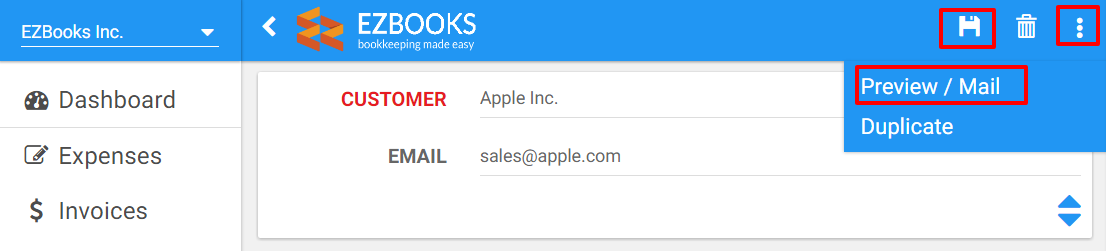
Once you finish click on the 'Save' button on the top right corner of the page, or if you are ready to send this invoice to your customer, click on the 'Preview / Mail' from the drop down menu (details in the ‘Preview Invoice’ section).
Navigation
Left Menu → Invoices → Select Existing Invoice → Edit → Add Item
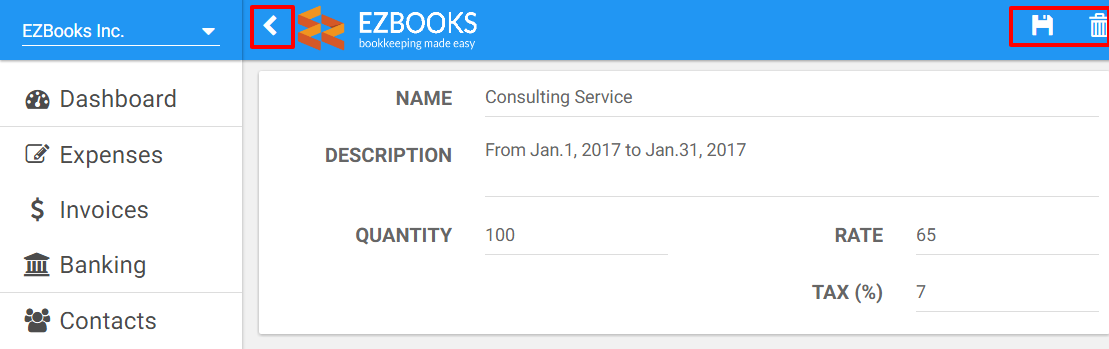
An invoice item represents a line on the invoice sent to your client. Continue from the invoice editing page, to add an invoice item, click on the '+' sign in 'Items' section, which will bring you to the invoice item page.
Enter the invoice item's name, description, quantity, rate and tax. The total amount of the item is:
Total = Quantity x Rate x (1+Tax)
Once finish editing, click on the 'Save' button on the right hand side or the 'Back' button on the left hand side of the menu bar.
Navigation
Left Menu → Invoices → Select Existing Invoice → Edit → Delete Button
To delete an invoice item, click on the 'trash can' icon on the right hand side of the menu bar.
Navigation
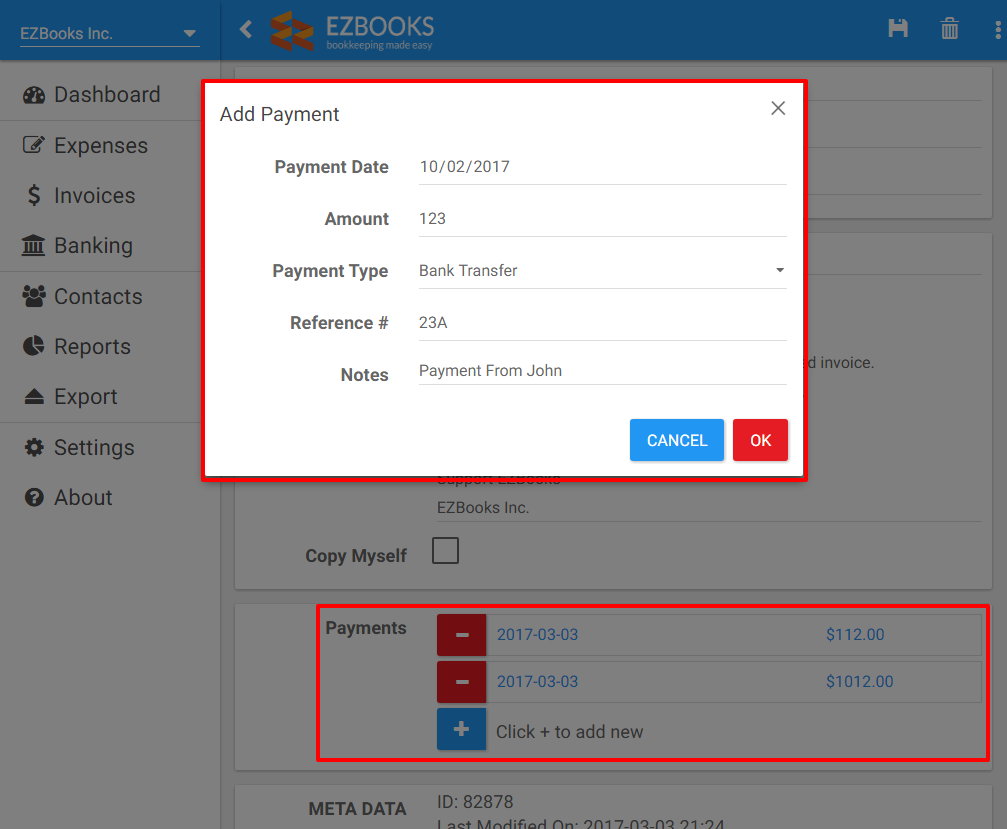
Left Menu → Invoices → Select Existing Invoice → Edit → Add Payment
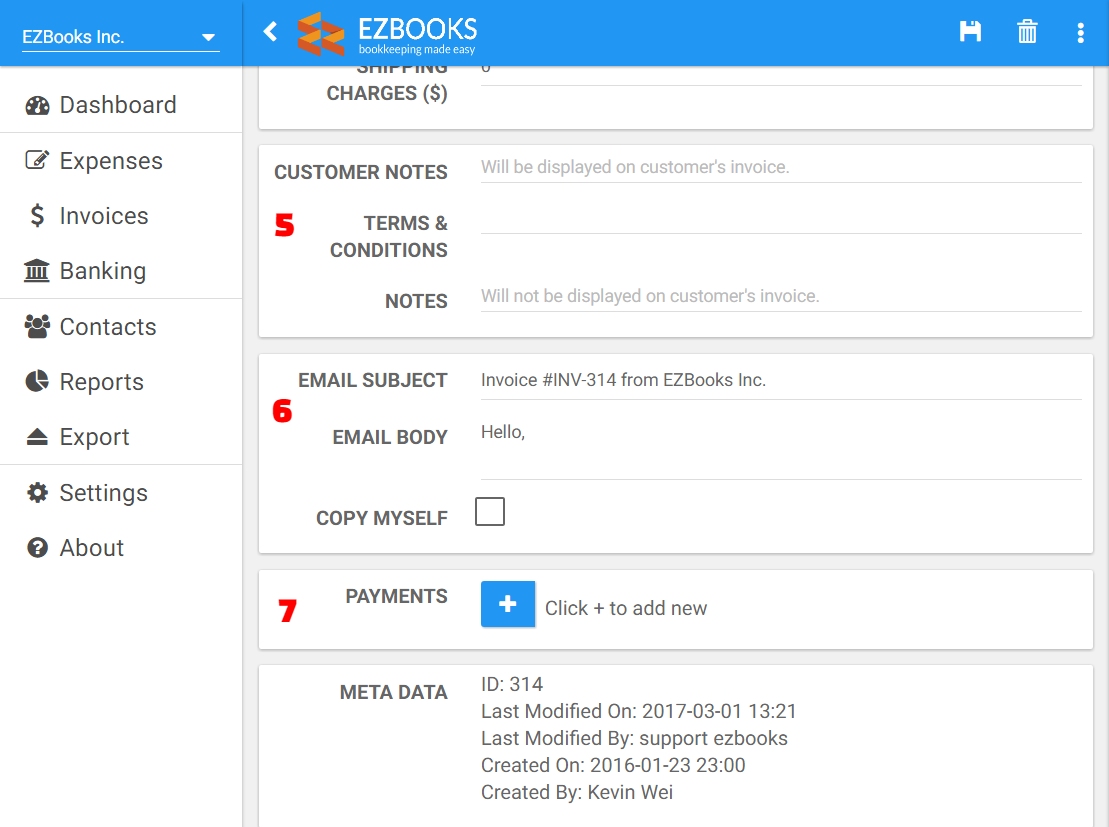
When you receive payments from your clients, either partially or fully, you can enter them in the 'Payments' section of the invoice editing page.
Navigation
Left Menu → Invoices → Select Existing Invoice
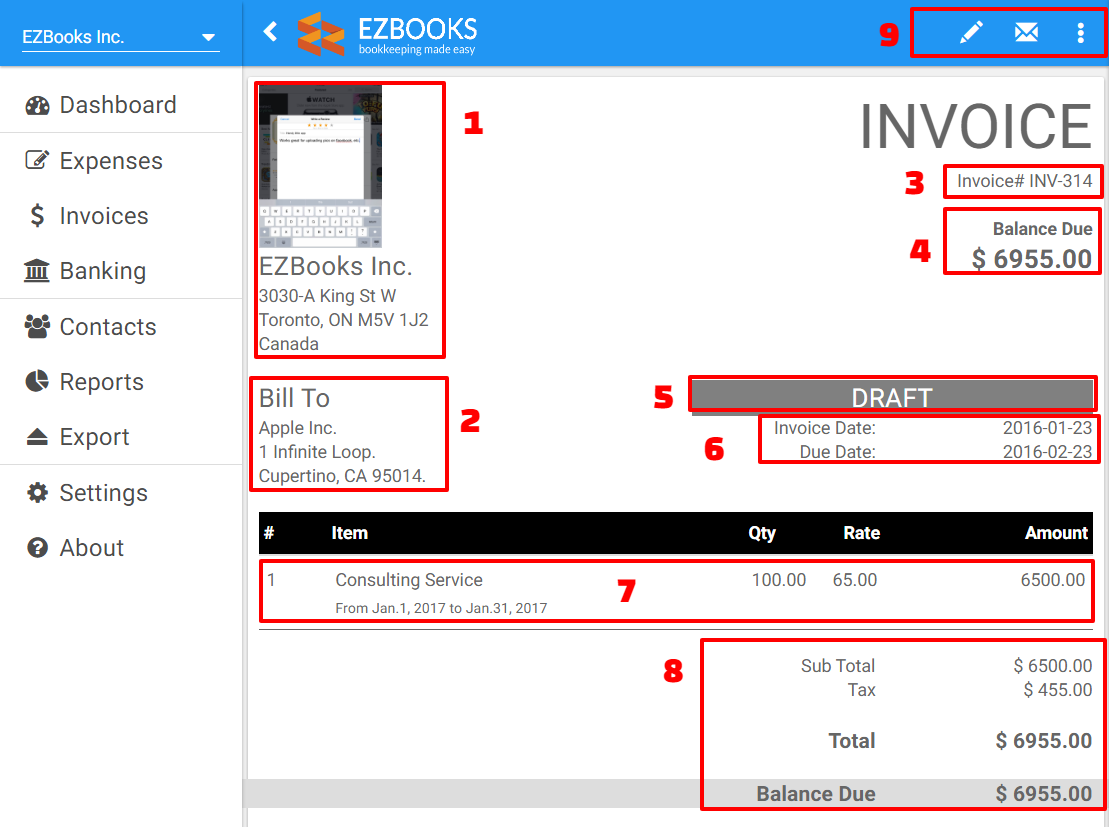
Once an invoice is prepared, it's in 'Draft' status. Before you send it out to your clients, you'd like to preview the invoice to make sure everything is correct. Click the 'Preview / Mail' from the dropdown menu in the invoice editing page which will bring you to the invoice preview page.
if anything is missing/incorrect you can always go back to the invoice editing page by clicking on the 'pencil' sign on the right hand side of the menu bar.
Navigation
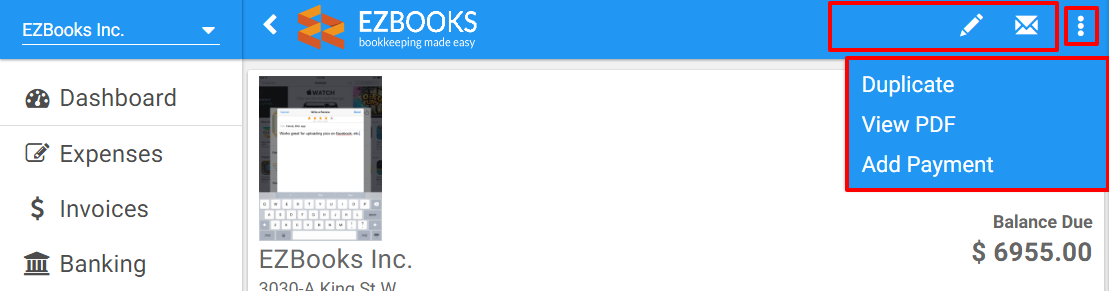
Left Menu → Invoices → Select Existing Invoice → Top Menu → View PDF
The PDF version of the invoice can be viewed at any time by clicking on ‘View PDF’ from the drop down menu in the invoice detail page
Click on the 'View PDF' menu item from the drop down menu.
Navigation
Left Menu → Invoices → Select Existing Invoice → Top Menu → Duplicate
You can make a copy of an existing invoice by clicking on ‘Duplicate’ from the drop down menu in the invoice detail page. To make changes to it, please refer to the ‘Create/Update an Invoice’ section.
Navigation
Left Menu → Invoices → Select Existing Invoice → Top Menu → Add Payment
Invoice payment can also be added here by clicking on 'Add Payment' from the drop down menu.
Navigation
Left Menu → Invoices → Select Existing Invoice → Edit Button
Any time you want to make changes to an existing invoice you can click on the pencil icon on the menu bar in the invoice detail page.
For details on how to enter invoice details, please refer to ‘Create/Update an Invoice’ section.
Navigation
Left Menu → Invoices → Select Existing Invoice → Mail Button
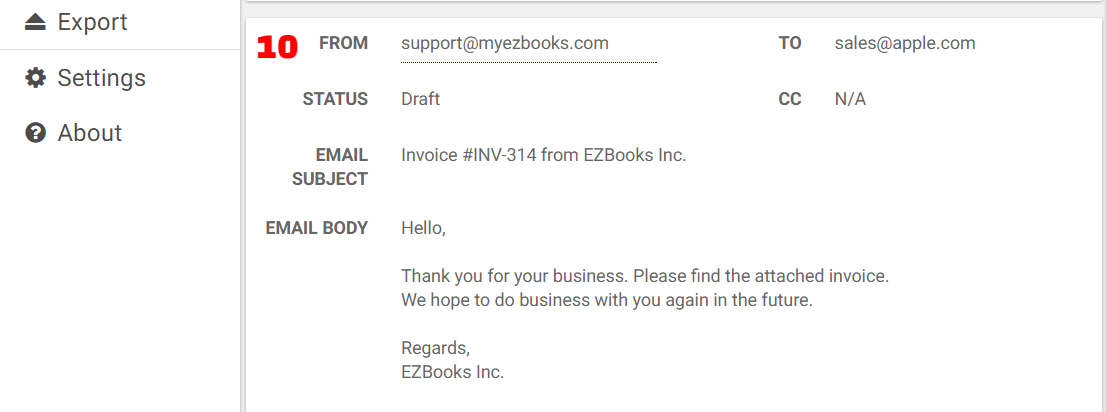
Once you preview the invoice and are ready to send the invoice to your clients, click on the 'mail' icon on the menu bar.
After the invoice is sent, the status of the invoice is changed to 'Sent'.
Navigation
Left Menu → Invoices → Select Existing Invoice → Edit → Delete Button
To delete an invoice, click on the 'trash bin' icon on the top right corner. Deleting an invoice will also delete the associated invoice payments and Bank transaction.
Recurring invoices are invoices that are created and sent to your customers on a recurring schedule.
Navigation
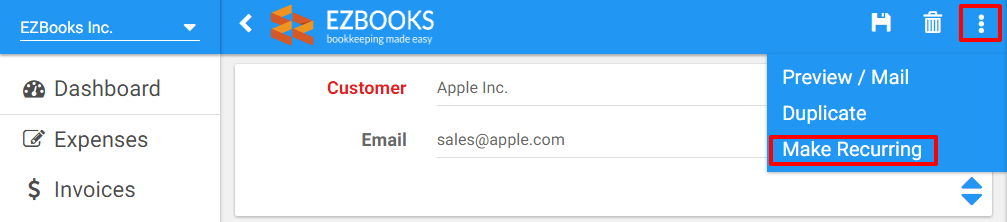
Left Menu → Invoices → Select Existing Invoice → Edit → Top Menu → Make Recurring
To create a recurring invoice, you first create a regular invoice (Create/Update an Invoice) or choose an existing invoice as a template, then you can make a recurring invoice from this template.
Open the regular invoice that you'd like to use as template, from the top menu bar, click on 'Make Recurring'
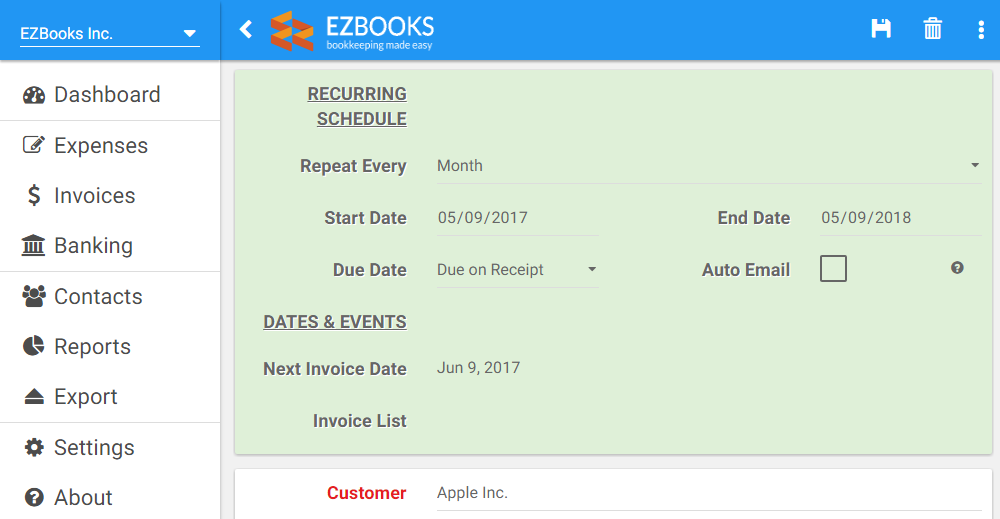
Once a recurring invoice is created from the selected template, you can fill the details of the recurring schedule:
Navigation
Left Menu → Invoices
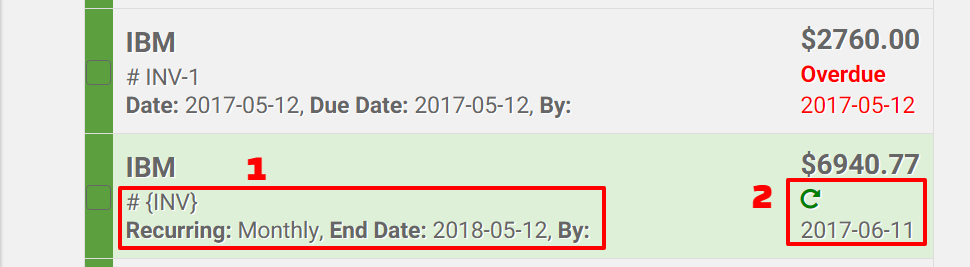
The recurring invoices are list on the same 'List Invoices' page. The recurring invoices have additional information shown on the listing:
By default, recurring invoices and regular (non-recurring) invoices are both shown on the listing page, while the recurring invoices are shown with a different background color and additional information about the recurring schedule. If you'd like to list the recurring invoices only, you can do that using the 'Filter/Search' functionality.
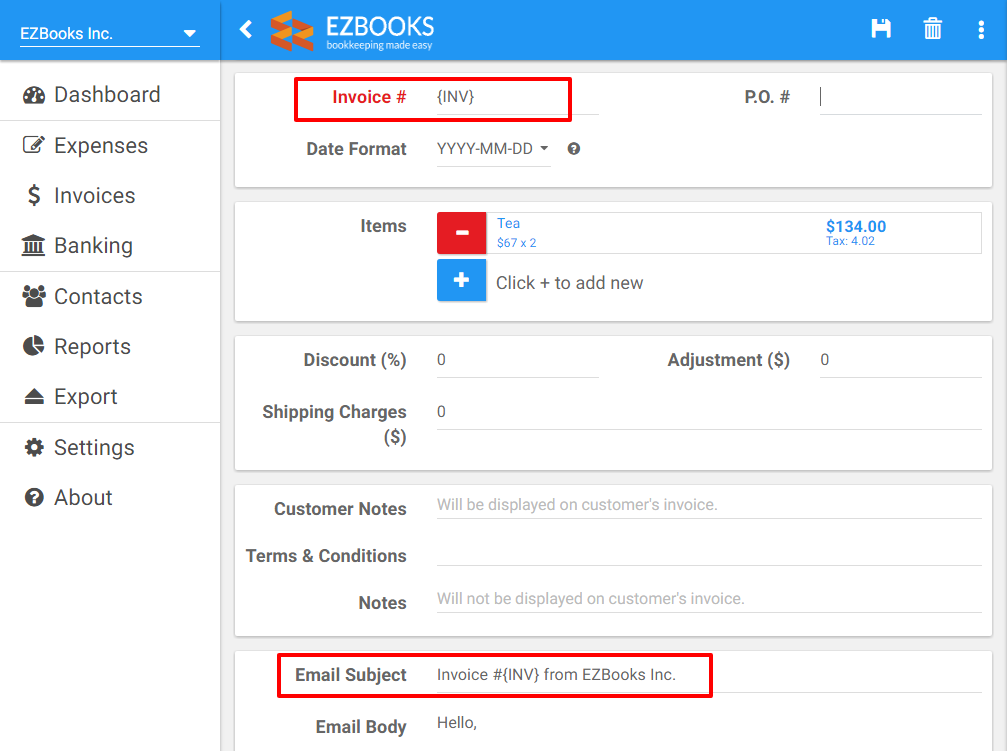
When setting up the recurring invoice, you can set up auto invoice numbering, so that the invoice number is automatically generated for each invoice. Using {INV} as the placeholder for invoice number. You can also use the {INV} as a placeholder in the email subject line.
The {INV} will be replaced by the real invoice number every time an invoice is created at the scheduled date.
The {INV} is configurable on the Business Profile page, it will be replaced by the invoice prefix and the next invoice number.
A recurring invoice can be deleted the same way as a regular invoice. Refer to 'Delete an Invoice' for details.
There are no invoice payments and transactions associated a recurring invoice, so deleting a recurring invoice will not change any payments or transactions.
To stop a recurring invoice without deleting it, just change the 'End Date' of the recurring invoice from the 'Create/Update a Recurring Invoice' page.
Navigation
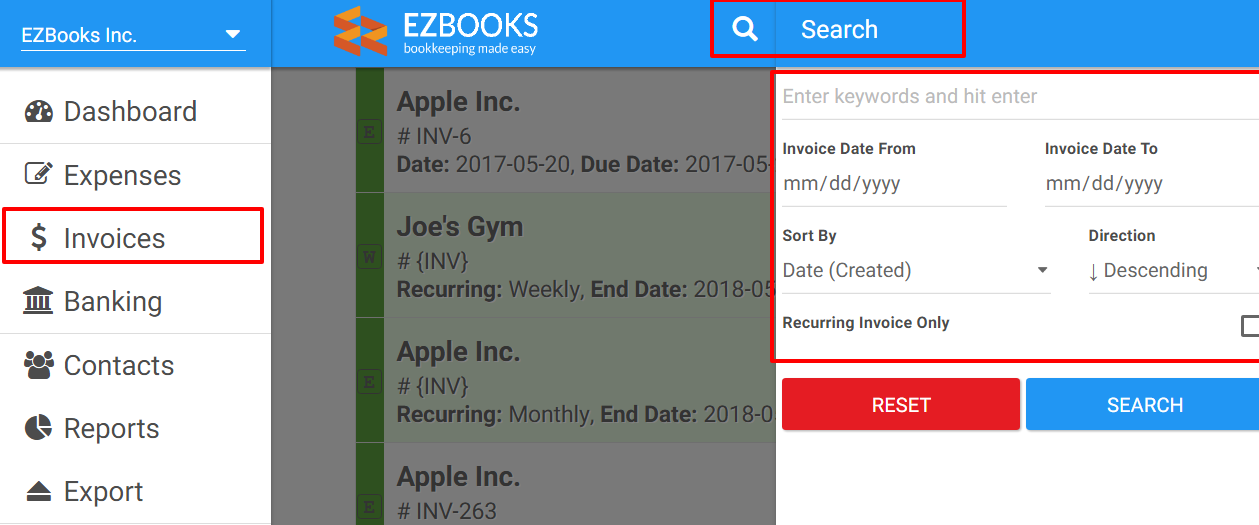
Left Menu → Invoices → Search
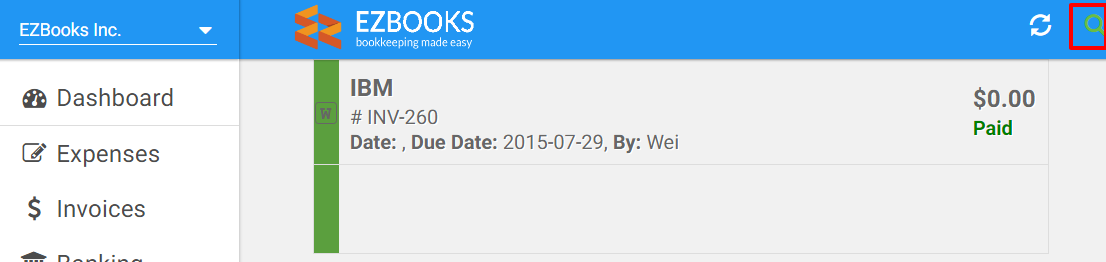
From the invoice listing page, click on the 'magnify glass' icon on the top right corner which will bring you to the right searching panel.
When a search/filter is active, 'magnify glass' icon turns to green, indicating an active filter is in place. In this case, a keyword 'IBM' is entered, so only the invoices from IBM are shown in the list.
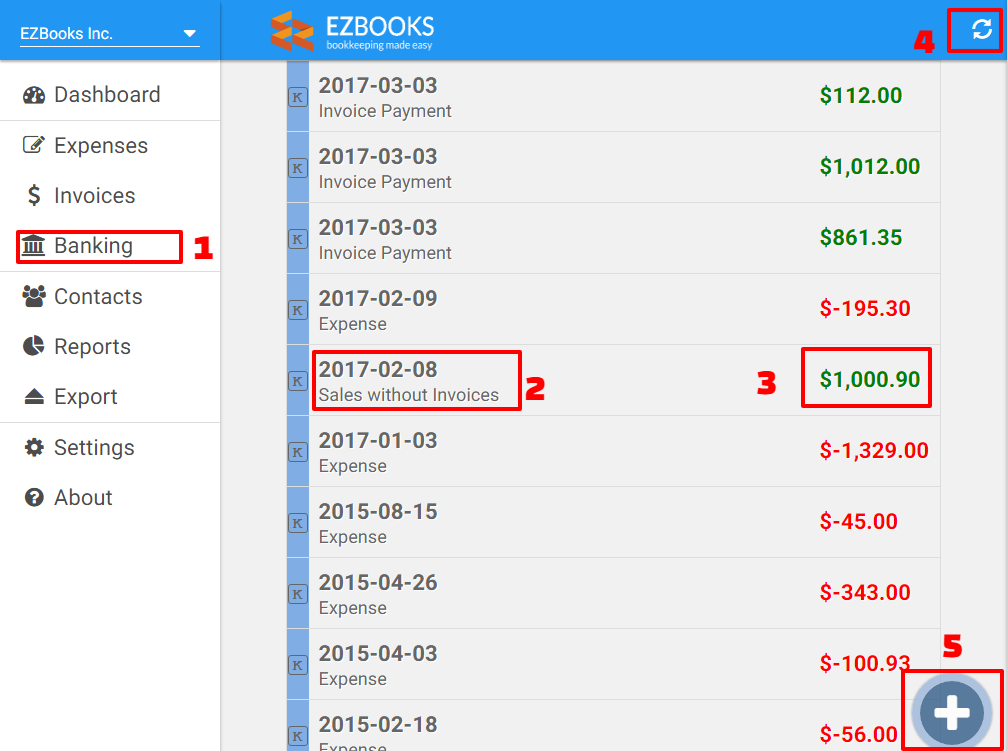
In the banking section, you will see all transactions - money in and out your business. Currently, only one banking account is support by EZBooks.
Navigation
Left Menu → Banking
To look at your existing bank transactions, click on 'Banking' from the left menu. You will see a list of transactions for the selected business.
Navigation
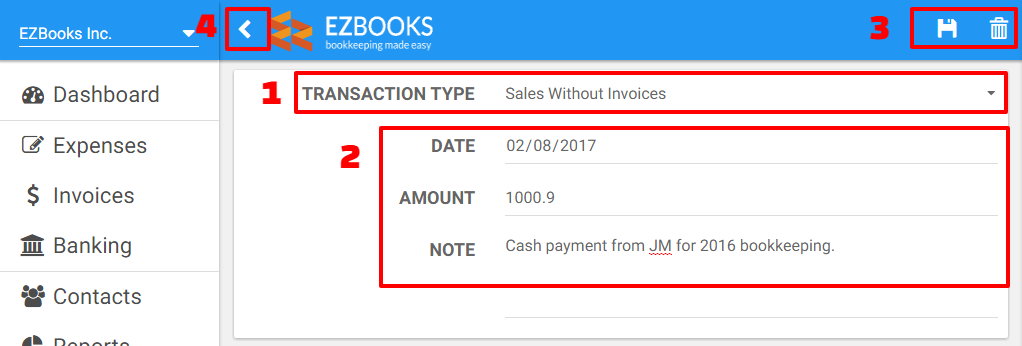
Left Menu → Banking → Select Existing Transaction
To look at the details of a transaction, click on a transaction in the list.
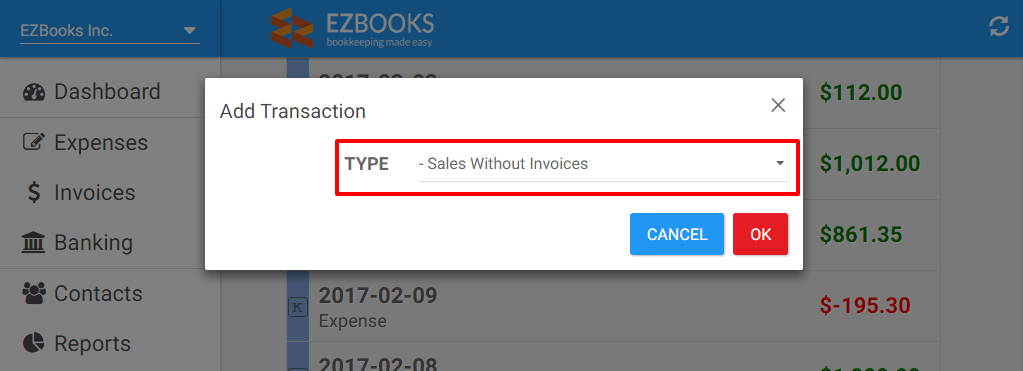
To add a new transaction, click on ‘+’ on the bottom right corner of the transaction listing page. An 'Add Transaction' popup will be displayed.
There are many types of transactions you can choose:
Money In
Any money coming to your business can be entered as 'Money in' in the following categories:
Sometimes, you make a sale without sending an invoice to your client, or you create an invoice through other means without using EZBooks. To record these incomes, you can create a transaction without creating an invoice in EZBooks.
Choosing ‘invoice payment’ will bring you to the list of invoices that you have created. Once your list of invoices are displayed, select the invoice to which you'd like to add the payment. Refer to 'Create/Update Transaction Details' section for details.
‘Other deposit’ is any other type of incomes that do not belong to the above. Refer to 'Create/Update Transaction Details' for details.
Money Out
Any money going out of your business can be entered as 'Money out' in the following categories:
When 'Expense' is chosen, an expense item is created, this is a shortcut to create an expense. This will bring you to the 'Create/Update an Expense' view. Refer to 'Create/Update an Expense' for details.
Other withdrawal is any other type of 'money out' transactions that needs to be recorded.
Navigation
Left Menu → Banking → Add Button
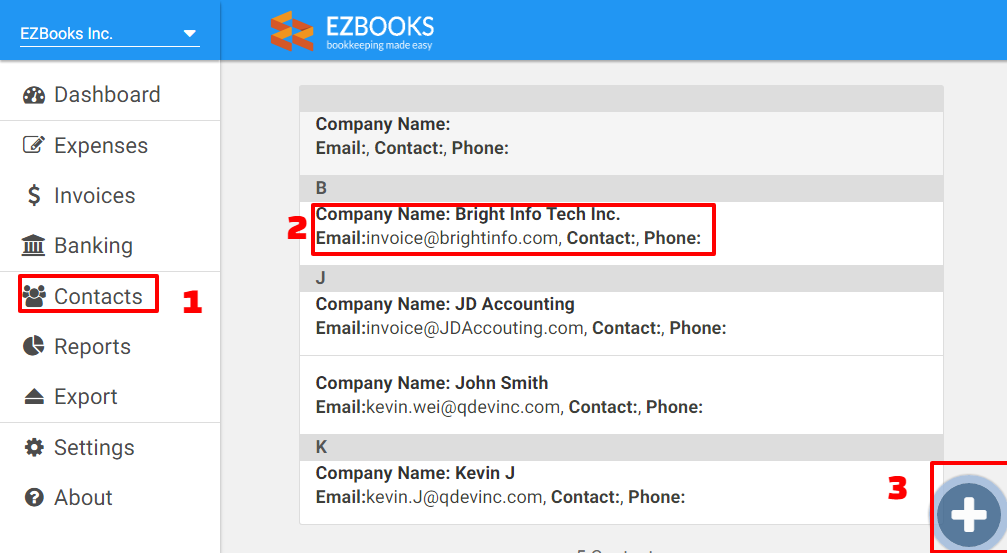
Contacts are the clients/customers that your business interacts with. Adding your clients to the contact list will help you find and track them easily and keep track of your accounts receivable.
Navigation
Left Menu → Contacts
To look at your contacts, click on 'Contacts' from the left menu. You will see a list of your contacts for the selected business.
Navigation
Left Menu → Contacts → Add Button
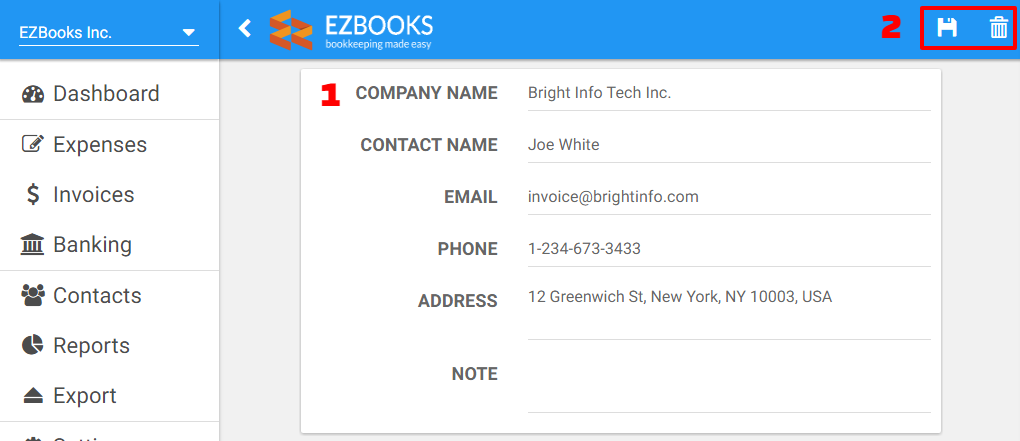
To create a new contact, click on ‘+’ on the bottom right corner.
To update an existing contact, click on the entry of the contact.
Navigation
Left Menu → Reports
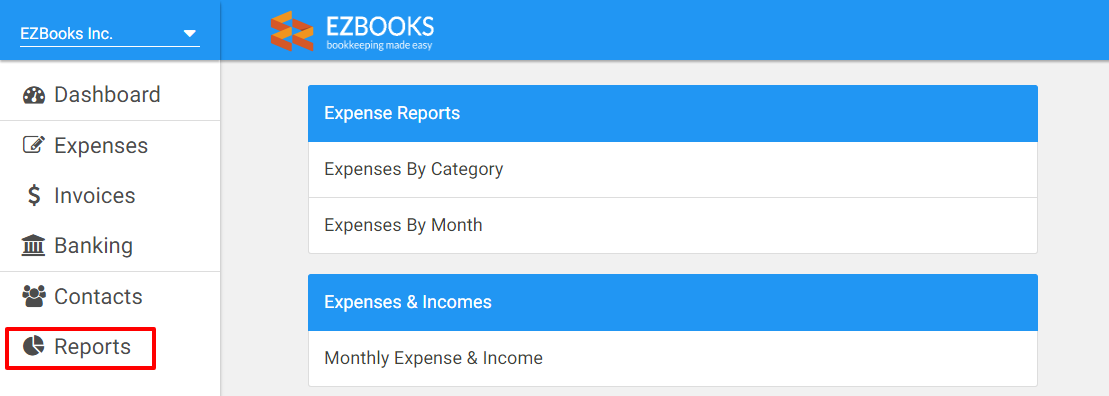
EZBooks provides a number quick reports for your business.
Navigation
Left Menu → Reports → Select Report → PDF Button
To print and/email the reports, click on the 'PDF' icon at the top-right corner of the report page.
EZBooks provides a convenient export functionality to export your book anytime.
Either you'd like to run complex financial reports, achieving your book for your own records or to send to your accountant for tax preparation and filing, you can easily export your entire book from the 'Export' view.
The export file from EZBooks is a zip file containing a MS Excel file, together with your attachments. It's easier to manage and view the content of a zip file on a PC.
Navigation
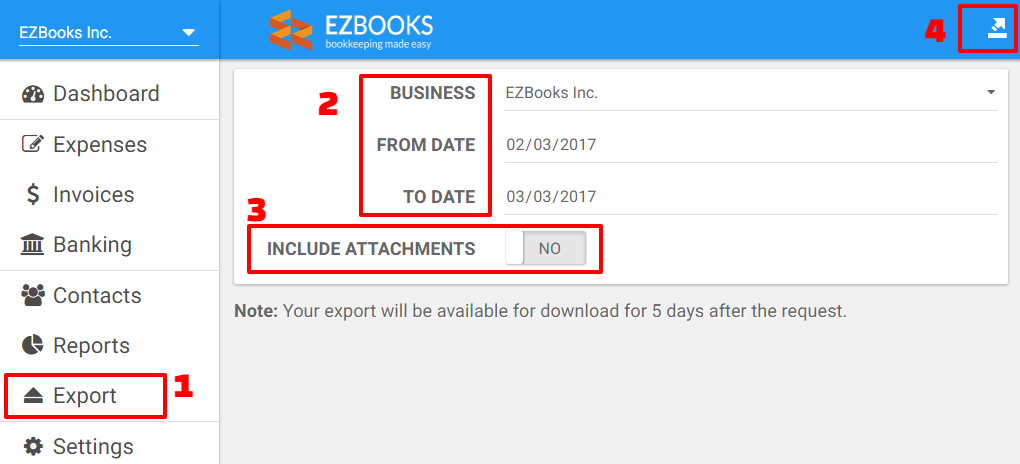
Left Menu → Export
An export of your book requires time to prepare. You will need first to create an export request from within the app, and once your book is ready, the application will send you a download link to your registered email for downloading.
To create an export request, click on the 'Export' from the left menu:
Click on the 'export' button and your export request is processed.
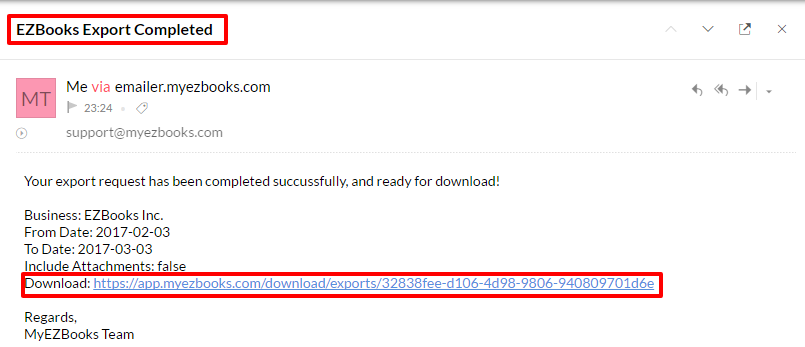
Once your export request is processed and your file is ready, the application will send an email containing the download link.
Note: The export is a zip file containing a MS Excel file, together with your attachments. It's easier to manage and view the content of a zip file on a PC.
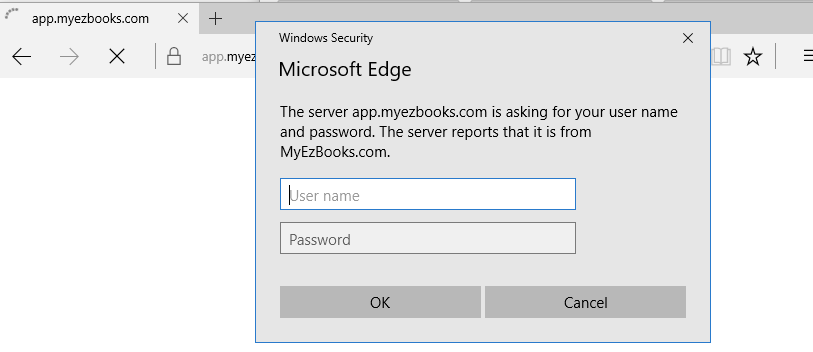
Clicking on the 'Download' link will prompt you for your username/password:
The credential required for the download is your EZBooks’ credential - where the user name is your email address. If you forgot your password, refer to the 'Forgot Password' section.
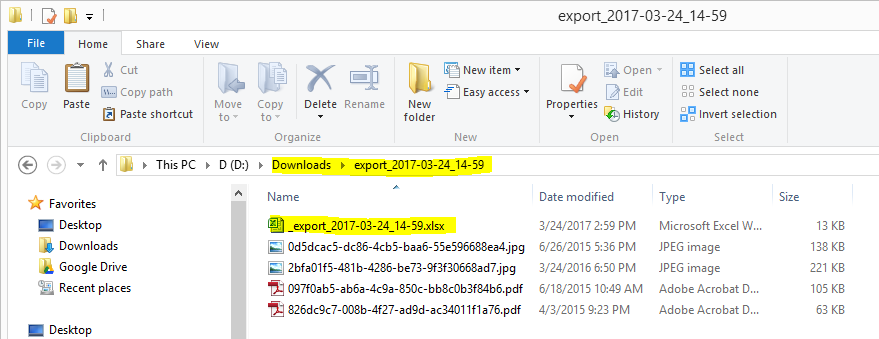
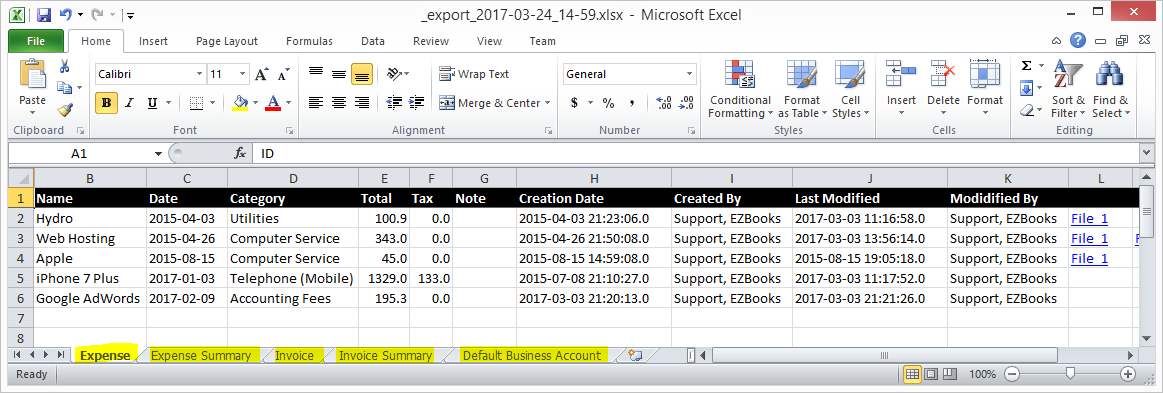
Once downloaded, the export file will be save on your PC as a zip file (e.g. export_2017-03-24_14-59.zip). You can extract the export using any zip utilities (such as WinZip, 7-Zip, etc.). After extracting the zip file, all your export will be in the directory like below:
Open the export_2017-03-24_14-59.xlsx file in Microsoft Excel:
Navigation
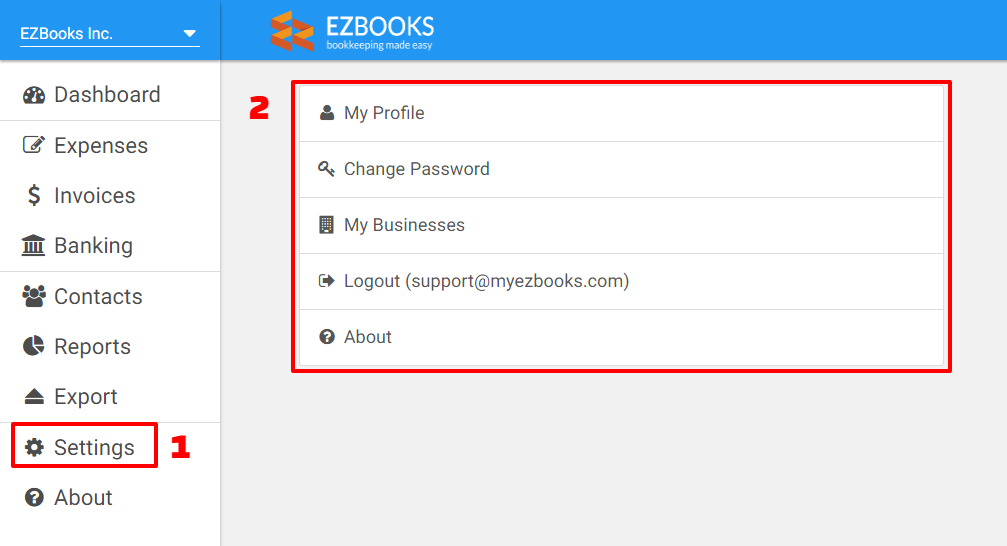
Left Menu → Settings
EZBooks has many settings where you can customize how EZBooks works. To access the settings, click on 'Settings' from the left menu.
Navigation
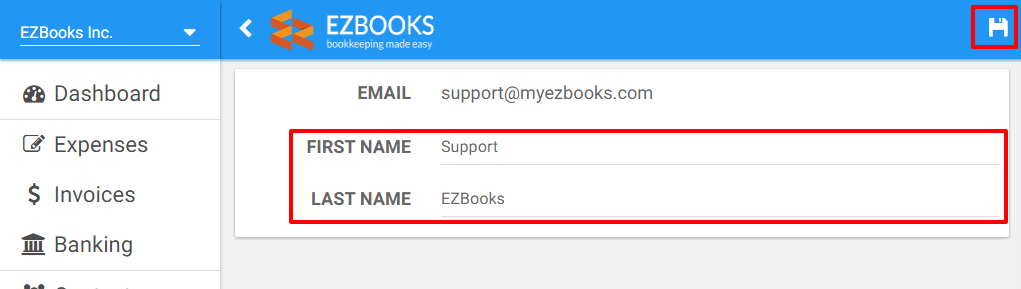
Left Menu → Settings → My Profile
You can change your first and last name in the 'Profile'. Once finished, click on the 'save' button on the top right corner.
Navigation
Left Menu → Settings → Change Password
This is where you can change your password.
The 'My Businesses' settings contain a list of configuration options for your businesses including email, profile, users, access control, etc.
Navigation
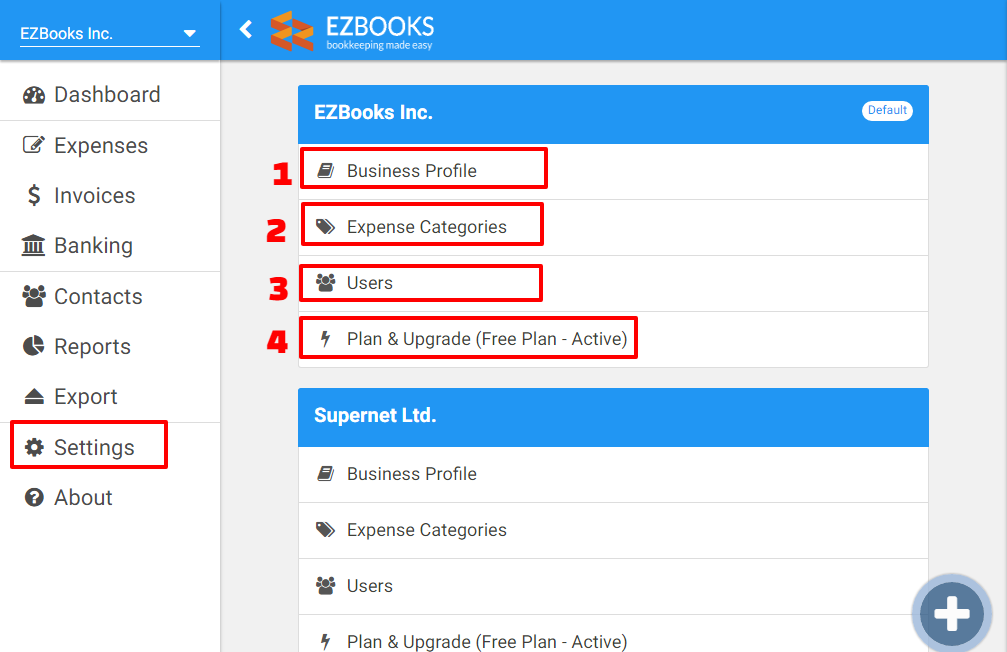
Left Menu → Settings → My Businesses
To access the list of business you own or have access to, click on 'My Businesses' from the 'Settings' list.
You can see a list of businesses and their related settings:
Note: Not all options are shown for every business your have access to. The options shown depends on your role in that business.
Navigation
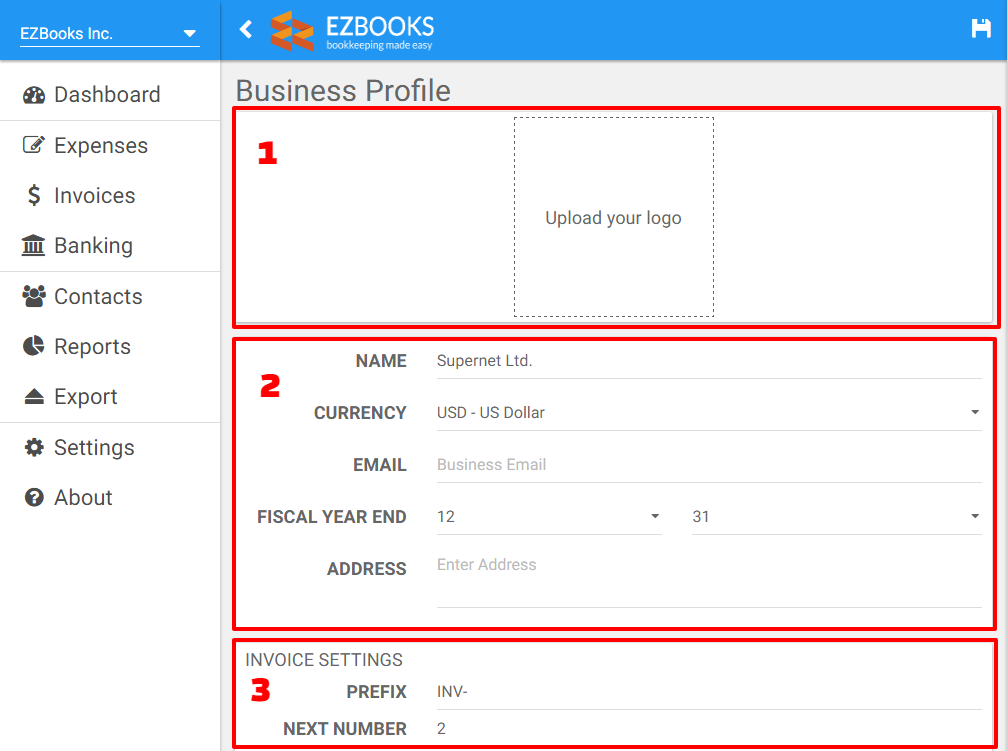
Left Menu → Settings → My Businesses → Existing Business → Business Profile
In business profile setting, you can changes:
Navigation
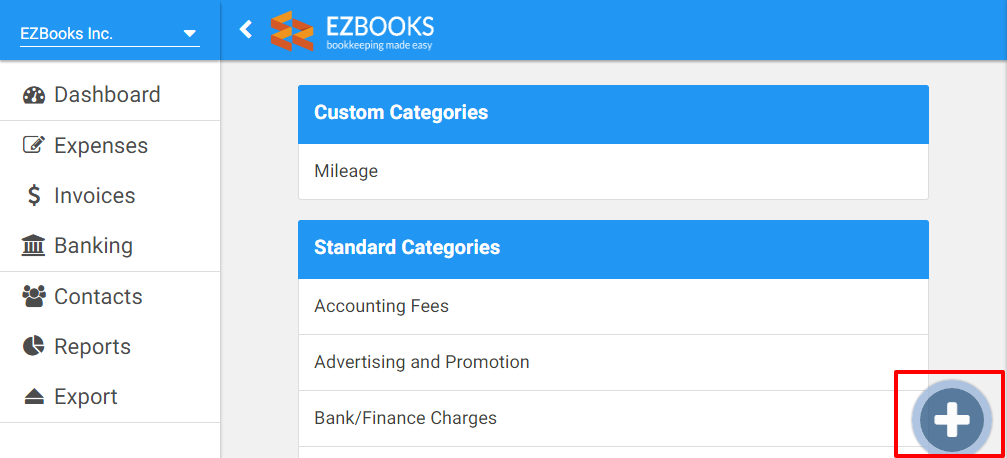
Left Menu → Settings → My Businesses → Existing Business → Expense Categories
Custom expense category are your self-defined categories for categorizing your expenses. Once they are created here, they can be used when entering your expenses from the 'Create/Update an Expense' page.
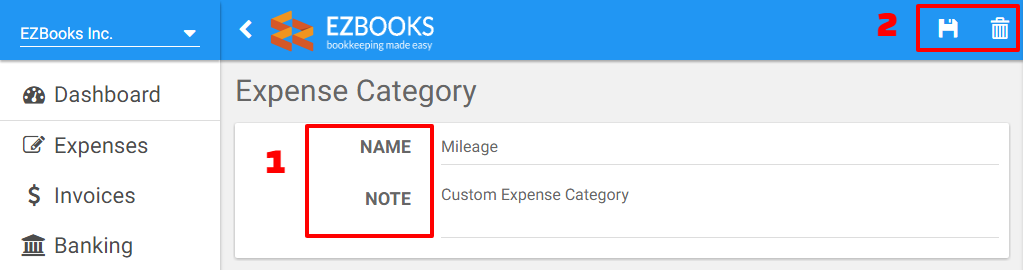
To create a new custom category, click on the ‘+’ on the bottom right corner which will bring you to the expense category entry page:
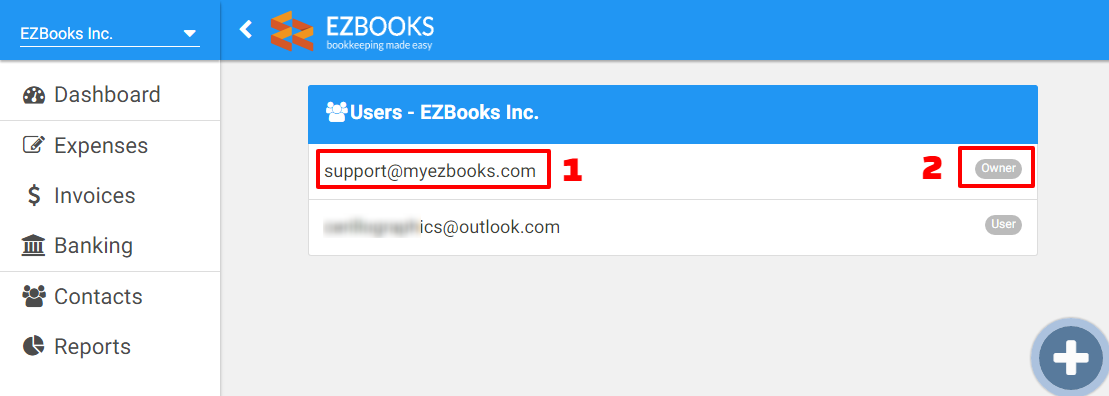
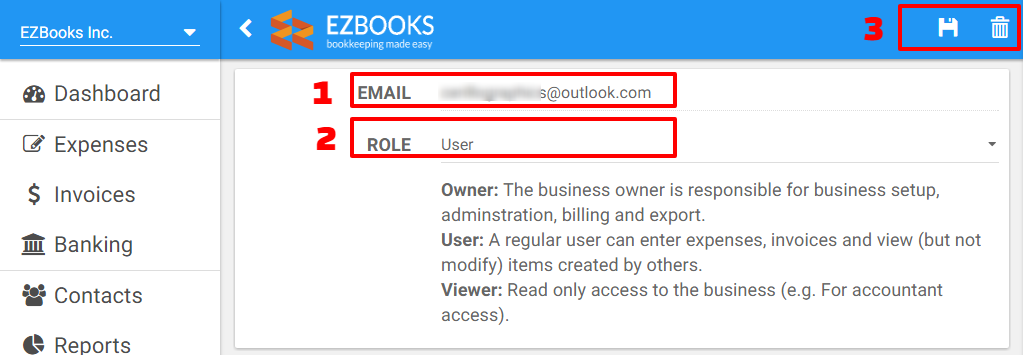
You can have more than 1 user having access to your business. Users can have different access levels defined by their roles in your business.
Navigation
Left Menu → Settings → My Businesses → Existing Business → Users
To view all users in your business, click on 'Users' from the 'Settings' list.
Navigation
Left Menu → Settings → My Businesses → Existing Business → Users → Existing User
To add a new user to your business, click on the '+' button on the bottom right corner of the user list, which will bring you to the create/update user page.
To update/delete an existing user, click on the entry of the user from the user list.
Navigation
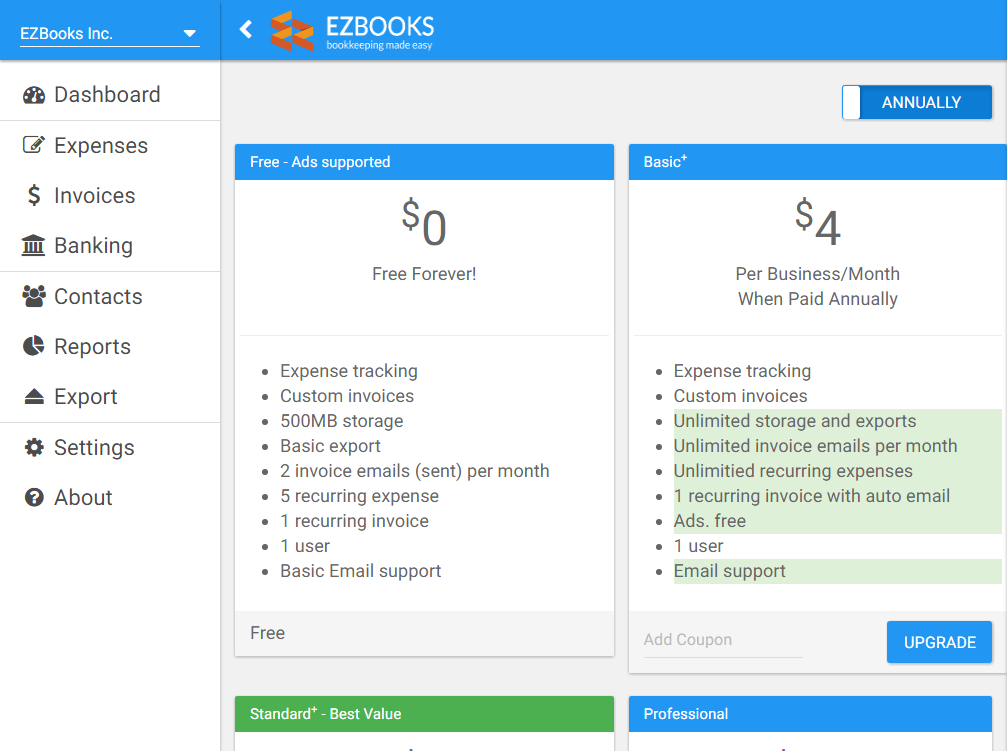
Left Menu → Settings → My Businesses → Existing Business → Plan & Upgrade
EZBooks is free with in app Ads. To have the Ads removed and use advanced features such as multiple users, please subscribe to a paid plan. For more details, please visit the 'Plan and Upgrade' settings from a browser on your PC.
Deleting a business is a manual process, please send the request to our support team (support@myezbooks.com) to have a business removed.
Navigation
Left Menu → Settings → My Businesses → Logout
To logout from EZBooks, click on 'Logout' from the 'Settings' list. Logging out from the app, will bring you to the login page, where you can login again or have your password reset.
Navigation
Left Menu → About
The 'about' view contains a list of help information. To access about, click on 'about' from the left menu.
Version: 1.04
Oct.2, 2017